Friday, January 25, 2013

Friends With Flair ~ Hearts on a Line

I'm so happy that its Friday! Among other happy things, it means that its time to link up your Unity projects to Friends With Flair! If you don't have any projects to link up, come hop around and enjoy the inspiration that everyone has for you.

This week I've got a card that I honestly don't know if I'm going to use as a Valentine or a birthday card...it could easily be either! I guess that if I don't make up my mind soon that I'll just have to make another one, and have both!

The layout was taken from this pin, I do so enjoy using my sewing machine on my cards!


The hearts are stitched only through the middle, so that they can be bent up slightly for dimension.


I'm using lighter weight cardstock for the card base, because it was the right color, so I needed to stabilize the back piece by lining...but who says linings have to be plain?


Supplies:

  • cardstock: recollections
  • printed cardstock: basic grey (sweet threads)
  • stamps: unity kom (feb 2011)
  • punch: the paper studio
  • ink: memento
  • other: my sewing machine
Thanks so much for stopping by, Enjoy!

Meredith

Thursday, January 24, 2013

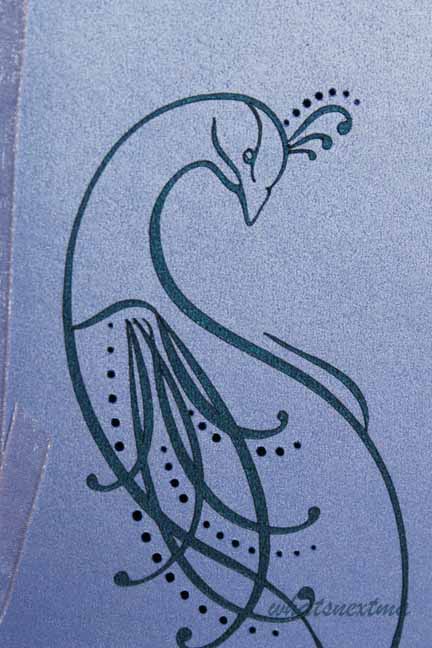
Peacock Calligraphy Card

The more I use my Silhouette Cameo cutting machine, the more I am impressed with its capabilities!

I'm still making my way through the list of birthday cards that I need, and one of the intended recipients loves peacocks (based on her pinterest pins!), so when I saw this calligraphy peacock cut file at the silhouette store I knew just which card to make for her!

Well, after I bought the file and first opened it in my software, I thought that there must be a mistake...the lines were much too thin to be workable...or so I thought!


The finished card size is 4" wide by about 9 1/4" tall, so if fits a standard envelope. I did have to cut the card a few times to get the result I wanted...the mess ups were my fault (such as, when will I ever learn to regroup pieces before moving them?) while trying to find the right cut settings for the cardstock I was using (and really, how did I not see that I was cutting the non-shiny side of the metallic cardstock?). But in the end, the result was stunning!

The thickest part of this design is a mere 1/8" wide, and the narrowest part? The narrowest part of this design is less than 1/32"!!!! And the Cameo cut it!!! Wow!


The design is part outline and part cutout of the base card, allowing the lining to peek through and add a surprise of color to the front, so gorgeous!


I didn't feel this elegant peacock needed much embellishment, so I just knotted a ribbon  off to the side and called it good. 

Supplies:
  • cardstock: Recollections (Michael's)
  • cut file: Silhouette America
  • ribbon: Great Value (JoAnn's)
I'm entering this card in the CAS-ual Fridays Challenge for this week...go check out the gorgeous entries from others!

Thanks for stopping by!

Meredith


Saturday, January 19, 2013

Colored Ice Crystals Valentine

Back in November 2012 there was a challenge on a message board that I belonged to to use the Ice Crystal technique on your card. It was a fantastic technique, and makes a lovely and unique background.

Here is the card I made using that background...you can see the 'ice crystals' on the dark blue cardstock behind the main image.


At the time of the challenge, there was talk on the board about trying the technique with colored water on white paper, and whether or not that would turn out. Well, I colored some of my solution with red food coloring (the liquid kind) and tried it out...it still made the ice crystals, but the color dried a faint pink...not something that I was going to work into the Christmas cards I was making at the time. So I put the page away until Valentine's. 

Guess what? That's right, I pulled it out and used it today! There is a challenge over on a new message board (the old one was closed) www.scrapzee.com this week to use a handmade flower on your card. I pulled out my box of flowers and found some great ones that I had received in a swap from Christina. (Thanks!) The red and pink flowers were perfect to use in a row on my card, (layout based on pin here) but I needed something to make them pop.

Enter my perfect pink shimmery ice crystal background! Its hard to capture in a photo, but the crystals really do shimmer and shine, and the coloring made it the softest pink color that is perfect to let the flowers take center stage!


I've been making Valentines for an exchange that I signed up for...do you like to swap and exchange handmade papercrafts? You should come check out the Scrapzee forum, its the friendliest place I've found for papercrafters on the web! 


Oh, and if you're interested in learning the ice crystals technique, there is a great video to explain it here.

Here's the inside...the card base that I'm using is pretty flimsy, so I always line the cards with something to reinforce them. Besides, I needed someplace to use the last two flowers!


Supplies:
  • card base: stash
  • flowers: swap from Christina
  • cardstock: coredinations (glitter), wausau (white)
  • stamps: studioG
I've found a new crafty challenge to play along with, Craft Us Crazy. Their current challenge is Valentine/Love/Red...this card oughta fit!

Thanks for stopping by to look!

Meredith


Friday, January 18, 2013

Friends With Flair ~ Naturally

Its time to show off your Unity projects with the Friends With Flair on the Unity blog!

I bought a new cut file (surprise!) And wanted to try it out...so out came the Cameo machine.

After I cut the card, it definitely needed some dressing up...so out came the stamps!

I used the snail and ferns from the 'Naturally You' set by Unity, the little snail is so cute with the heart antennae! 


Inside I stamped some more ferns...and that's where the cut file is cute...it cuts the little heart corner as a part of the card. You can tuck the front of the card into the heart if you want...I decided not to this time.


Supplies:
  • patterned cardstock: Basic Grey
  • cardstock: stash (green), Recollections (brown), Wausau (white)
  • stamps: Unity
  • cut file: Silhouette America store
  • ink: Memento
Thanks so much for stopping by! I love reading your comments!

Meredith

Tuesday, January 15, 2013

Valentine Banner

I'm on a mission...a mission to convince my two boys that having a Valentine's Day party can be fun! I'm thinking a simplified version of the Christmas Gingerbread House decorating party that I throw...only with lots of heart shaped sugar cookies and a few colors of frosting. 

First step...decorate! Hmm...I know that I had a box of Valentine stuff somewhere...but after looking everywhere that I can think of, its nowhere to be found! What to do? Pull out the papercrafting supplies, of course!

I started with a simple banner for the mantle...


I'm still trying to use what I have...although it was very tempting to head out to the store that has paper on sale this week! I managed to resist the temptation...barely!

I used American Crafts paper...I've read good things about how great a quality paper this is for cutting machines, and I have to agree wholeheartedly! Talk about cutting as smoothly as butter with no glitches...wow!

I actually designed the banner myself, since I didn't see one that I liked in the Silhouette store...bonus...it means that I get to share it with you!

LoveBanner

The file includes the three different banner shapes and the LOVE letters, the heart that I used is not included, since it is not my file. But you can download it from birdscards here, it is free as well.

Once I had the banner pieces cut and assembled, it was as simple as going to my ribbon stash to find a complementary ribbon to hang the banner...I found this gorgeous dyed seam binding from 3 Girl Jam and knew that it was the one! 


Just some simple knots between the banners and then let the ribbon hang loose to look pretty...I love it when its easy!

Here's another look at the whole thing...I really like the non-traditional Valentine colors!


Supplies:

  • patterned paper: American Crafts (a la Carte)
  • cardstock: stash (black)
  • ribbon: 3 Girl Jam (London Blue)
  • cut file: Me!
I'm linking up over at the 3GirlJam challenge blog: Its a party with ribbon, you have until Jan 31st to enter...you should join in!

And over at the Really Reasonable Ribbon challenge blog: Valentines Day/Love & ribbon, you have 'til Jan 29th for this one!

And sharing over at the Hookin Up with HoH linky party, too!

Now I guess I'll have to figure out what to put on the tables and in my frame that I like to have out with seasonal decor!

Thanks so much for stopping by to look!

Meredith
Pink and Brown Valentine

Over at the Cameo Creations challenge blog the second challenge for January is to use pink and brown...I signed up for a Valentine Card exchange over on the Scrapzee forum, so knew right away what type of card I wanted to make!


The patterned paper came with a magazine, but it was a great size polka dot to use as a background. I even drug out the sewing machine! Sewing on cards adds so much texture...besides, its just fun!

The cut file came from Birds Cards, here. I added an offset to the outside, to add contrast.


I used the hearts from the cutout as a border along the inside layer, I didn't want to cut into a whole new page of brown cardstock, and the piece I had left was not wide enough to cover the inside. Design opportunity! I also used a smaller heart to cover the spot I stopped and started the stitching.

I'll add a stamped sentiment to the inside a bit later...I'm having too much fun cutting right now to clear my desk!

Supplies:
  • cardstock: Recollections (brown), stash (pinks)
  • patterned paper: Hot Off The Press
  • ribbon: The Paper Studio
  • digital cut file: birdscards.com

Thanks for stopping by!

Meredith


Friday, January 11, 2013

Friends With Flair ~ Triple Time Birthday

Its time for the linky party with Unity Friends with Flair again! I've you've made a project with Unity stamps and would like to join in on the fun, I'll see you there!

This week I'm still working on family birthday cards...I'm up to March birthdays so far! This one will be for my dear mil, she's one of those people that it is a true joy to make things for, as she appreciates the time and detail that go into making handmade things.

I used the triple-time technique, choosing to stamp on patterned paper...it turned out pretty good! I like this technique because it offers such a lovely result for just a little measuring and cutting. Add a ribbon, and you're done!


Supplies:

  • cardstock: Wausau
  • patterned paper: Recollections
  • stamps: Unity
  • ink: Unity
  • ribbon: The Dollar Tree
Thanks much for stopping by!

Meredith