Friday, January 11, 2013

Friends With Flair ~ Triple Time Birthday

Its time for the linky party with Unity Friends with Flair again! I've you've made a project with Unity stamps and would like to join in on the fun, I'll see you there!

This week I'm still working on family birthday cards...I'm up to March birthdays so far! This one will be for my dear mil, she's one of those people that it is a true joy to make things for, as she appreciates the time and detail that go into making handmade things.

I used the triple-time technique, choosing to stamp on patterned paper...it turned out pretty good! I like this technique because it offers such a lovely result for just a little measuring and cutting. Add a ribbon, and you're done!


Supplies:

  • cardstock: Wausau
  • patterned paper: Recollections
  • stamps: Unity
  • ink: Unity
  • ribbon: The Dollar Tree
Thanks much for stopping by!

Meredith

Friday, January 4, 2013

Lots of Birthdays!

I have a lot of friends and family that have birthdays in the first couple months of the year, and always end up being late with cards and gifts because January and February seem to pass so quickly that I don't have time to make the cards...well, I'm determined to not be the same this year!

The early birthdays include two of my nephews...and I've got both of those cards done!

I chose bright colors...they are both elementary school ages...and have found a fabulous website with a talented designer who offers her cutting files for free! Its called Birds Cards, and she has a range of wonderful files that cut quite smoothly, go visit!

The diamond lattice background and both the birthday greetings are from her site.


I have a difficult time using ribbon on cards for guys...but I think that the simple use on these cards works...I'll save the ruffles and such for other cards.

I'm linking these two up to the challenge at 3GirlJam ~ anything goes, if you want some ideas on how to use ribbon in creative ways...go check out the design team and the links...so awesome!

Supplies:

  • patterned cardstock: The Paper Studio
  • ribbon: the Dollar Tree
  • cutting files: birdscards

Thanks for stopping by!

Meredith

Friends With Flair ~ Banners and Borders

So every Friday, the Unity Stamp Company sponsors a linky party for anyone who uses their fabulous stamps to show off what they have been working on. They call it Friends with Flair, and you can find it right here.

If you haven't managed to make it into the craft zone this week, then I recommend that you go take a look-see at the other projects to gather inspiration!

I managed to try out one of the silhouette files I had...I must say, it sure is easier on my hands to have the machine cut all the borders rather than punching them myself!


I'm in serious need of birthday cards...as more than half the family and friends on the list that I try to send to have birthdays in January and February!!!


Hmm...I'm thinking that the banner with the stamp needs set off some more...it looks lost among all that great color...I'll try using a larger banner of the dark blue cardstock as a mat...


Yup, that's better! The stamp is from the May 2010 Kit of the Month...here's a closer look. Its a very finely detailed stamp...I think that next time I'll use a different ink, Distress Inks don't seem to do it justice.


One down...lots to go!!!

Supplies

  • cardstock: Wausau
  • patterned cardstock: SEI
  • stamp: Unity
  • cutting file: Silhouette
Thanks so much for stopping by!

Meredith

Saturday, December 29, 2012

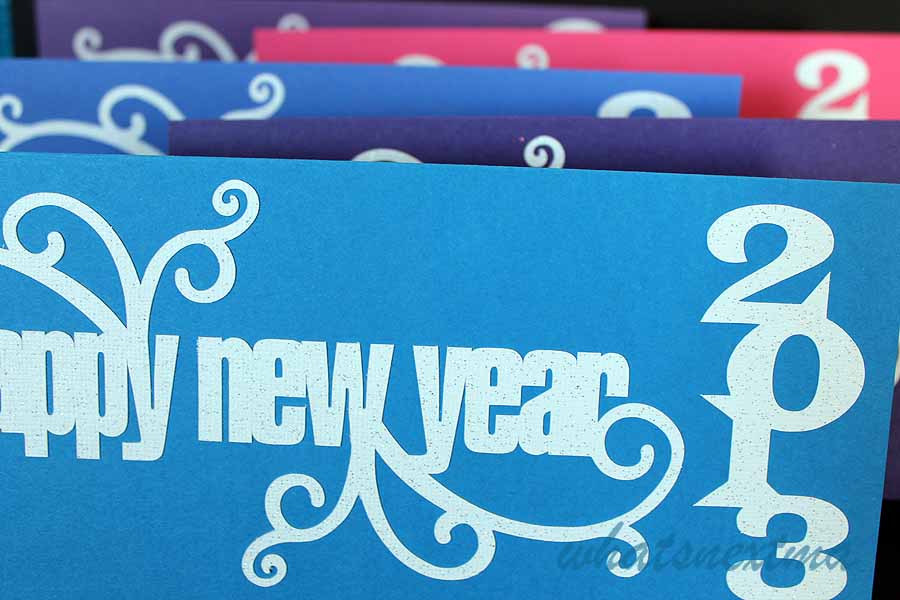
Happy New Year!

Ok, it might be a bit early for the greeting...but its not really the holiday that I'm after this time.

For the first time in a long time I've actually written a family holiday letter...but not in time to send out as a Christmas card...so I'm sending New Year's greetings instead!

I chose a swirly greeting from the Silhouette store by Jennifer Wambach...she is rapidly becoming my favorite designer to purchase designs from...I really like her style! 

I made my own 2013 in the software, then made page after page of cuts...if I get all the addresses that I asked for, I'll be sending out 40 of these cards...as it is right now I'll be sending 33. Which is a big change from the zero that I usually manage to send!

Here's a look at the front...I usually fancy things up on my cards with a fun technique or two...but facing 40 cards to make...I wanted to get them out the door before January 2014...so I kept it simple. I did use sparkly cardstock for the designs...that adds some bling, right?


I did give in to putting another design on the inside though...I purchased this star border and cut it from a contrasting cardstock. We'll sign around the stars, I'll tuck in the printed letter that I wrote...and off they'll go!


I'm trying to be good and use up the cardstock that I have...so there is a real mix of colors, they look fun and happy, don't they?


Do you send out holiday cards or letters on a regular basis? I enjoyed writing this one so much, its definitely going to be high on my priority list for the end of next year!

I'm linking up over at the Cameo Creations Challenge ~ New Year's Theme. Join in on the fun if you would like to!

Thanks for stopping by!

Meredith


Friday, December 21, 2012

Friends with Flair

How fun...its that time again! Time to link up your Unity projects and see what everyone else has been up to the past week!

Even if you're not linking...you should check out all the cute projects at Friends with Flair this week!

I'm trying to crank out a set of cards that can be used for many occasions...and am trying out several layouts that I've pinned to this board.

Here's one...keeping the sentiment general and layout simple without looking plain...


I figure that if I keep making the samples two at a time I'll eventually find the layout that I love...and meanwhile, I'll be stocking up on my ready-made card stash that I like to keep on hand!

Supplies:
  • cardstock: Coredinations (purple), scrap bin (white)
  • stamps: Unity SOTW
  • embossing folder: The Paper Studio
  • punch: Martha Stewart (border), EK Success (frame), The Paper Studio (circle)
  • ink: Colorbox
Thanks much for stopping by!

Meredith

Sunday, December 16, 2012

Penguin Christmas Tags

The more I play with my Silhouette Cameo, the more I like it!

I hosted a swap recently to exchange Christmas tags, and in my search through Pinterest (love that place!) I came across these adorable tags...I loved them, but I'm not much into painting, so I turned the design into a paper craft!

I opened up the Silhouette Studio software (and just so you know, I do not have the Designer Edition...just the basic software that comes with the machine) and used the tools to draw the shapes for the pieces of the penguin. 

It was way easier than I expected! If you haven't played with the drawing tools in the software yet, I encourage you to do so!

Here's the finished tag...Isn't he adorable?


I made a whole bunch for the swap...


And then I couldn't stop!


Supplies:

  • cardstock: Coredinations
  • ribbon: stash
  • googly eyes


And since I'm so tickled with making my own cutting file, I wanted to share it with you! The download includes step by step instructions to make the tag/ornament.

If you download the penguin, please come back and leave a comment when you've cut him out...I'd love to hear (and see) how he works for you!

Penguin Tag/Ornament .studio file

I'm linking up to the challenges at:


Thanks for stopping by to visit!

Meredith

Thursday, December 13, 2012

Mitten Wreath

Oh wow, did I ever have some fun with this project! 

I've been playing more and more with my Silhouette Cameo, and when they had 50% off their designs for Black Friday...I might have gotten a bit giddy with purchases...

Anyway, one of the designs that I purchased was a fabulous mitten wreath by Jennifer Wambach. 

I made one of the wreaths out of some Basic Grey papers (Jovial) that I had along with some shimmery cardstock (Coredinations). The design was incredibly simple to put together...there are four layers, the base wreath, the outlines of the mittens, the mittens and the cuffs. Because the base layer has the outline shape built right in, it is easy to glue and layer the mittens seamlessly.


I used six different patterned papers for the mittens and cuffs, inked them with black distress ink and glued them to the mitten base. I then used dimensional squares on the back of the mittens and glued them to the wreath base. Too easy! Oh, I did enlarge the original design...I just sized it up until the wreath base filled a 12x12 page, then cut everything accordingly.

The cutouts on the mittens alternate between snowflakes and circles. In this pic you can see that clearly and see the shine of the cardstock that I used.


Altogether a great project...but this one went out as a secret santa gift...shh...


Now I had to make one for myself! This time I pulled out blues...since that's my favorite color! I used DCWV patterned papers, and textured cardstock (Coredinations) plus some cardstock from stash.

I modified the design a bit, because I wanted to add buttons to the mittens. With the software that came with the Cameo it was as easy as ungrouping the design parts and deleting the snowflakes and bubbles from the mitten interior! 

After inking and gluing, this is the result!


I cut two additional mitten bases, then stamped them with some cute winter greetings from Unity and hung them from the middle of the wreath with baker's twine that I made into pom-poms.


I'll be linking up to Friends with Flair to show off the Unity stamps...if you have a project made with Unity you should join in!

I'm also linking up to the Cameo Creations Challenge ~ Christmas creations

And to the 3 Girl Jam Challenge ~ Christmas Inspirations

Thanks for stopping by! If you have a Silhouette machine, come back soon because I'll be sharing my first cutting file that I made myself! 

Meredith