Saturday, July 27, 2013

Friends with Flair ~ Free Flower Image

Hello Friends! I'm so happy to be participating with the Unity Friends with Flair linky party...it got posted later than usual on Friday, so the linky was open until Saturday, yeah!

Last week I was able to play just a bit with the free image that Unity provided as part of their CHA celebration (there's a sale too, have you checked it out?) and I pulled out some coloring utensils to have some fun.

I didn't like the way that markers were going (I'm still a novice, so if I don't take my time I mess things up quickly) so I turned to my pencils...not much more experience, but at least they don't bleed like markers. ;-)

Anyway...here is the result


I like the way the flowers turned out, the pencil almost makes them look fuzzy and soft to me...not so much the leaves...I should have looked at the other entries (there was a contest on facebook) too see examples of how to color them in a way that would highlight the design, not hide it, as I feel mine did.


A huge thank you to Unity for sharing this image with us...such a talented team of designers they have!

Supplies:

  • cardstock: both are stash...
  • image: Unity Stamp Company
  • pencils: Prismacolor
Thanks for stopping by! I look forward to visiting your blogs to see what you've been up to!

Meredith

Friday, July 19, 2013

Friends with Flair ~ Field of Sunflowers

It's Friday again! The day I get to play along with the Friends with Flair linky on the Unity blog! If you've created with Unity goodies, play along! If you haven't, then click through and comment anyway, there are so many talented projects to see!

Friday is typically the day I receive my Stamp of the Week in the mail, and last Friday, my favorite one *ever* arrived! You see, a few weeks ago the owner of Unity Stamps asked on facebook what images we (the customers) would like to see on the upcoming SOTW's, and my reply was sunflowers. To anyone who knows me, this is no surprise...I love those happy flowers! 

In fact, I've got some blooming in my backyard right now!


Well, the sunflower stamp is gorgeous, of course, but I kicked it up a notch by using a mask to stamp multiple times on my cardfront...then I actually pulled out my markers and used my meager coloring skills to brighten things up a bit! With some distress ink around the white areas, my work was done! I didn't think that the front needed much embellishment, so popped the colored panel up for a bit of dimension, tied a ribbon, and that was that.


It reminds me of the fields of sunflowers that I used to drive by when I lived in Kansas...quite a sight to behold! I used another Unity set to stamp an encouraging sentiment on the inside.


And look...I want to show off the 'signature' on the back, too. My sister took a trip to China (she got to hold a baby panda!!!) and while she was there she bought me something called a 'chop'. It is a stone column stamp carved with a unique identifier that traditionally has been used to verify documents. In my case, my name in English and phonetically in Chinese. (Although for all I know, it could say, "Crazy crafty lady"! LOL)


When she sent it to me, I tried to use it with my regular stamp pads...no luck. So I ordered the special ink and gave it another try...awesome! The ink almost acts like a dense sponge...and the ink itself is solid, I don't know how else to describe it...but it works like a charm!

Supplies:

  • cardstock: Recollections (brown), Neenah (white)
  • stamps: Unity Stamp Co
  • ink: Memento (brown), Ranger Distress Inks (blue)
  • markers: Spectrum Noir
  • ribbon: stash

I hope you had a crafty week, and thanks for stopping by!

Meredith

Friday, July 12, 2013

Friends With Flair ~ A New Generation of Stampers!

I had the best time this past week!!! Lots of rambling and pictures ahead!

I was invited to lead an activity for the youth group at a daycamp that was held for girls age 8 through 11. I got to choose the activity within the theme, "Past, Present, Future". I chose to have the girls make a collage cover for a journal, for them to record their wishes, dreams and plans in.


I bought a composition book for each girl, and brought along a huge stack of scrapbook paper, every black stamp pad that I had...and my big box of Unity Itty Bitty stamps! I keep all my SOTW and the other Itty Bitties that I have in one box...and I figured that it would be easier for the girls to sort through and choose than flipping through binders (and that it would be far more likely that my stamps would be semi-organized when they were done!


I had the girls cover the front and back of the composition books with torn bits of paper, then they could glue on their name that I cut with my Silhouette. After that, they were allowed to move to the 'stamp' table to choose stamps and apply the designs to the book. To finish up, if they wanted to glue some ribbon on the edge they could.


They had so much fun!!! I had so much fun watching them plan and decide then jump in to create! I love that they all look unique. Some of the girls covered every bit they could, some were more particular about what they put on...and all of the girls were so accepting of the creative process! None of them fussed about things not being 'perfect'. It was wonderful!


This was the sample I made to show them how it could look.

The girls were in awe of the selection of stamps...they thought I was joking when I told them that the box was not even a quarter of the stamps that I own...please tell me that some of you can relate???? I was grateful that the selection of stamps was so varied in style and theme...pretty much anything the girls asked for, they could find in the box. Big flower? Check! Owls and penguins? Check! Bicycle? Check! Heart? Double Check! Young girl? Check! Puppy? Hmm...looks like that one should go on the request list for the SOTW! Who wants a puppy SOTW by Phyllis Harris??? Ooh yeah!!!

I'm hoping that the leaders decide to make this an annual event! I know that the projects will change, but I'm sure that I can share my love of paper and stamping with the next generation again!

All in all, a great start to my week...and now I get to finish off my week with the linky party on the Unity Blog ~ Friends with Flair!

Thanks so much for stopping by!

Meredith


Sunday, July 7, 2013

Silhouette Challenge ~ 3D Shadow Box

A few months ago I saw a beautiful link that led me to the super talented Marji Roy at Ashbee Designs. I emailed her about the design she had created and cut with her Silhouette, to see if they were available for purchase. At that time, they were not, but not too long after, she started posting her designs for sale in the Silhouette store!

If you have not seen them yet, go take a look now! They are fabulous! I want to cut the birch files for my office, and will get there...but decided to start with a single shadow box to get the feel for the way they are put together. 


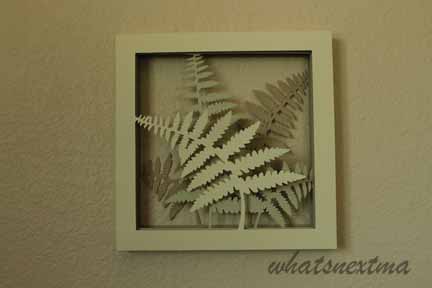
I cut the fern shadow box, and have it in my craft room right now...I love the way it looks! So sophisticated and understated at the same time! I decided to use three shades of tan that have greenish tones to them...and placed the colors the opposite of the way they are in the designer's example...I layered the colors from lightest to darkest.


Mrs. Roy has excellent instructions for her designs posted on her blog here, (oh, how I wish that more of Silhouette's designers did this!) but I learned a few things that I will apply the next time I put together one of the shadowboxes. As far as sizing goes...draw a separate box in a new color the size that you want the finished shadowbox to be...then pull the front layer until the scored fold lines match it, as long as the whole layer still fits on your cutting mat, you are good to go! 

When removing the design from your cutting mat...have a scraper handy and go slowly...you don't want to stress the connecting lines and have them tear on you. (Ahem...)

I also learned that you don't need as much room between the layers as you think you do...I ended up finagling the layers together because I left too much room between them...just follow the instructions, and put the layers just barely sized down from each other.  

One thing that I will likely do differently, the next one I make, will be to cut the design layer a second time, out of the same cardstock and adhere it behind the 'box' layer, to add some stability to the 'picture' layer...I find that the ferns are a bit floppy...this is of course because of the cardstock I chose to use...if you use a sturdier cardstock, there will be no need to do this.

All in all, I'm incredibly pleased with the design...and will happily admit to purchasing each of the shadowbox designs as soon as I saw them in the store! 

Supplies:
I'm linking this post up over at the weekly Silhouette challenge ~ 3-D projects.

Thanks for stopping by!

Meredith


Friday, July 5, 2013

Friends with Flair ~ Flower Fairy Graduation Card and Geisha Throw

I know a dear young lady who graduated from high school this year, yeah! Her dream is to become an English teacher in Japan, so of course she loves all things Japanese. 


I found a colorful Japanese Flower Fairy image to download and print on a book page for the front of her card, then turned to my Unity stamp stash for the best sentiment to use...


 I love this one! Such enthusiasm!


I die cut the fairy and a contrast mat, then added some gems as accents...done!

It went pretty darn well with the gift...I made her a lap blanket with Geisha print cotton on one side and spa Minky fabric on the other...my own design even! It is fairly large ~ 60" x 70"...plenty of room to snuggle under!


Here is a closer pic of the detail on the side edges...they are gathered panels!


She loved her gift...and what is funny is that my daughter did too...while I was visiting her we went to a store so she could pick out fabric for a version to honor her time in Maine...Coast Guard and blueberries! (It'll work, I promise!)

Supplies: (for the card)

I'm linking up to share over at the Unity Friends with Flair Friday!

 Thanks for visiting!

Meredith


Thursday, June 27, 2013

Friends with Flair - Celebrations in White

I joined a swap over at the scrapzee forum for white on white cards - wow, deciding on how to decorate these cards was much harder than I expected! I thought at first that I might go with cards like these, but after a search on Pinterest, decided to do a bit more embellishing.


I pulled out my trusty Silhouette Cameo and started cutting...the card base is a great design from Birds Cards. The size I cut it out was a mistake, as it is smaller than a standard size, but once I decided to add the flowers off the edge, I decided to leave them smaller, since the card still fits in a standard envelope. The flower is from the Silhouette online store by Lori Whitlock. I added the ribbon through the card front - and then decided to leave the front as is.


I added just a bit of color with the inside though, using light blue cardstock to line the cards, and finding just the right stamp for the card in my Unity stamps. I wanted the cards to be versatile, since they are for a swap, and I figured that this sentiment could be used for several occasions...birthday, graduation, wedding, congratulations, whatever!


I'm trying to use up what I have...instead of just buying and storing...but with the stash that I have...it'll still be a while before I feel a pinch, I'm sure! ;)

Supplies:

  • cardstock: coredinations (white), stash (blue)
  • cut files: bird's cards (card base), silhouette america (flower)
  • ribbon: dollar tree
  • brad: making memories
  • stamp: unity


All in all, lots of fun!

I'm linking up with:


Meredith


Friday, June 14, 2013

Friends with Flair ~ More for Father's Day

Quick post tonight...having fun with friends is keeping me too busy to play long on the computer!

I didn't want to miss another week of Unity Friends with Flair...I love sharing in the creativity and inspiration!

I made another couple of cards using the fabulous SOTW for Father's Day, such a great graphic design! 


The details are the same as for the first Father's Day card I made...which I decided to use for dh...these two will go to my dad and my fil...they're making their way through the postal system now!

Thanks for stopping by!

Meredith