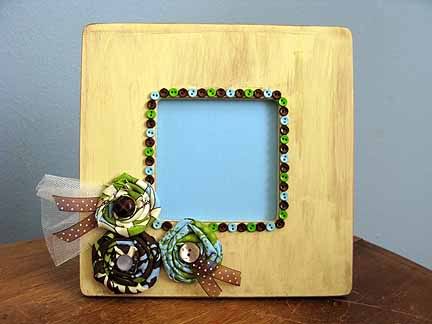
Like many others, I hop around blogland from time to time, and one of the sites that I am inspired by is Ucreate, there are always such wonderful things posted there! Something that was started last year is a Create With Me! monthly craft-along. I stumbled upon the January post, and saw that we are invited to make a darling rosette frame following this tutorial from The Secret Stitch Club, how cute!
So, I picked up a blank frame, dug out the paint and glue gun, and got to work!
This is the result...

My rosettes didn't turn out quite like the one's in the tutorial, I guess I'll just have to make some more and experiment until I get that tighter twist...
Here is a closer look at the embellishments, the buttons and ribbon and tulle add so much cute dimension!

I haven't decided what I want to put in the frame yet...maybe a Valentine specimen layout...maybe one of the versions of the Keep Calm sayings that are all over now...but right now, I'm so tickled that I am crafting again that I smile every time I see it!
I am also linking up to the Altered Arts Challenge over at Sweet Paper Treats, a new find for me...you should play along too!
Breakdown of the project:
Supplies:
frame: from Michael's $1
paint: Craft Smart acrylic paint, from Michael's, 3 for $1, I used cream and brown
fabrics: tulle and 3 prints from Hobby Lobby, less than $3, and there is plenty left over
ribbon: from Hobby Lobby, $1, with a ton left over
buttons: larger ones on rosettes from stash, tiny blue, green and brown ones by Favorite Findings at Hancock Fabrics, $2.30 for two packages
Instructions: follow the tutorial at The Secret Stitch Club and modify as you wish!
Update: I figured out what I would like to put in the frame!
I thought that I'd make the display more of a seasonal one, than a holiday specific one...so I chose a couple of scrapbooking paper scraps and punched some butterflies using the new Fiskars butterfly punch...too cute!

After I punched out the butterflies, I scored on both sides of the 'body', then just used some quick-drying glue to put them right on the paper. I still smile every time I see my little frame!

Enjoy!
Meredith
This is fabulous, I love making those flowers...they are fun to do with scraps of paper as well...thanks for playing with us at SSPT
ReplyDeleteI like your rosettes. Neat project.
ReplyDeleteThis is SO gorgeous! I love the embellishments that you did to the rosettes!
ReplyDeleteohhh awesome
ReplyDelete